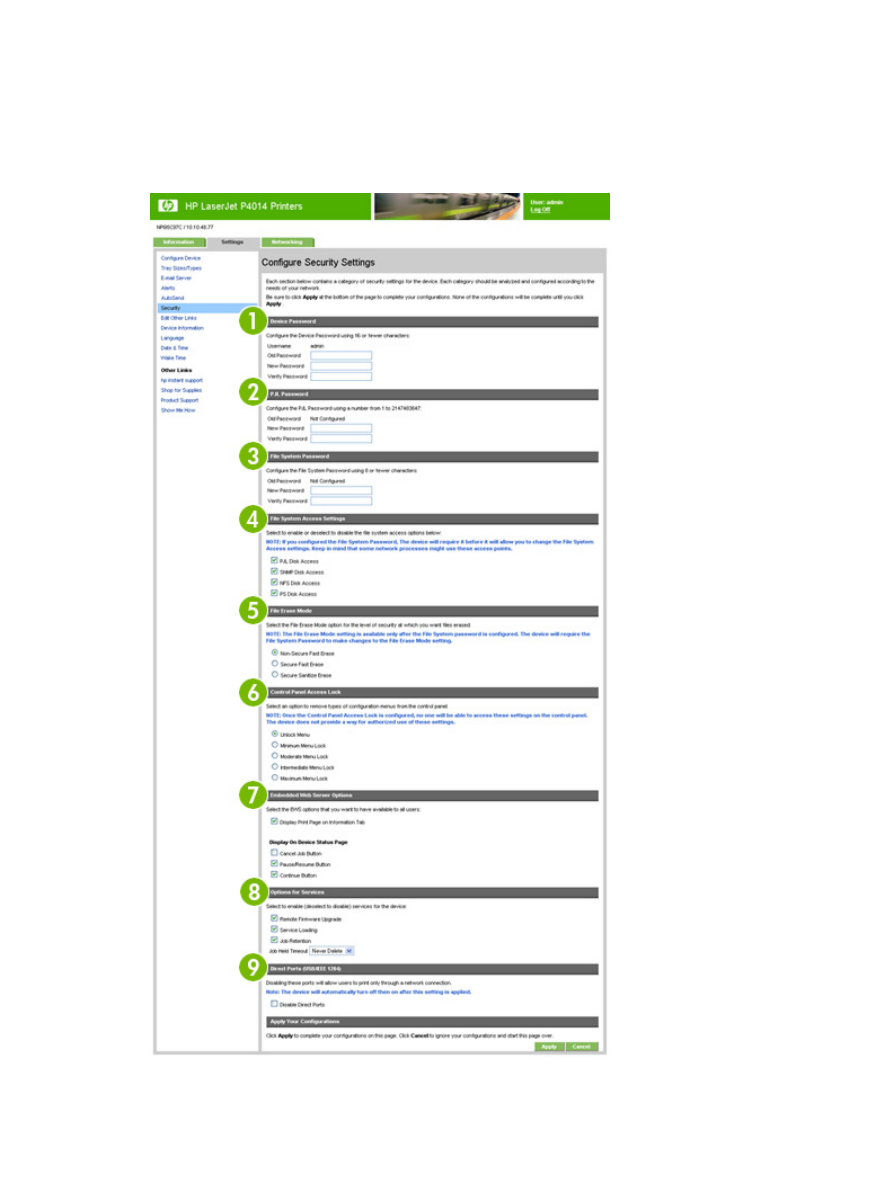
Configure Security Settings
Use the Configure Security Settings screen to set the desired levels of security. The following
illustration and table describe how to use this screen.
Figure 3-9
Configure Security Settings screen
ENWW
Security
37

Callout
Area on the screen
Information or capability that the area
provides
1
Device Password
Use this feature to set your password
using a maximum of 16 characters. The
device password allows you to control
who can access and change device
settings.
To assign or change the device
password:
1.
If the device currently has a
password assigned, type the
current device password in the Old
Password text box.
2.
Leave the New Password and
Verify Password text boxes blank.
3.
Type the same device password in
the Verify Password text box.
4.
Click Apply at the bottom of the
page.
5.
An authorization dialog box
appears. Use the new password to
re-authenticate to the device.
To disable the device password:
1.
Type the current device password
in the Old Password text box.
2.
Leave the New Password and
Verify Password text boxes blank.
3.
Click Apply at the bottom of the
page.
4.
An authorization dialog box
appears. Use the new password to
re-authenticate to the device.
2
PJL Password
PJL (Printer Job Language) is a
command language that enables some
features of the printer such as banner
pages. Setting the PJL password locks
access to these PJL features.
Set the PJL password so that only
authorized users can access PJL
enabled features. The PJL password can
be any number between 1 and
2147483647.
3
File System Password
Use this feature to prevent unauthorized
users from changing any file system
configuration options and from
performing a secure storage erase
operation.
The file system password must be set to
perform a secure storage erase
operation and to configure the secure file
38
Chapter 3 Configuring the product from the Settings screens
ENWW

erase modes and the file system external
access. The File System Password can
be up to 8 characters long.
4
File System Access Settings
Use this feature to select which
subsystems or embedded printer
languages have access to the device file
systems.
NOTE:
The File System Password
must be configured before these settings
can be modified.
5
File Erase Mode
Determines the behavior of a secure
storage erase operation and the erase
operation that the printer automatically
performs to make space available on a
hard disk drive for incoming print jobs.
The erase operations are designed to
add available space to the printer's hard
disk drive, and to prevent unauthorized
users from accessing confidential
information from the printer's hard disk
drive or other erasable storage device.
NOTE:
The File System Password
must be configured before these settings
can be modified.
The following erase modes are available.
See row four in
Table 3-6 Security
on page 35
for more information.
●
Non-Secure Fast Erase. When a
Secure Storage Erase is
performed, files on the mass
storage device are not actually
deleted. Rather, the reference to
the files in the file system tables is
removed.
●
Secure Fast Erase. When a
Secure Storage Erase is
performed, file information is
overwritten with a random
character pattern when it is deleted.
●
Secure Sanitize Erase. When a
Secure Storage Erase is
performed, a secure, repetitive
algorithm is used to overwrite all file
information and remove any
residual data persistence. A
random character is written to all
bytes of deleted sectors. Then the
complement of that character is
written, and finally, another random
character is written. The device
might restart a number of times
during this process.
6
Control Panel Access Lock
Use this feature to lock the device control
panel, preventing unauthorized users
from accessing it and changing the
ENWW
Security
39

device settings. Users can still read the
settings on the printer’s control panel.
The following options are available.
●
Unlock menu. Allows full control
panel access.
●
Minimum Menu Lock. Locks out
the
RESETS MENU
,
CONFIGURATION MENU
, and
the
I/O MENU
.
●
Moderate Menu Lock. Locks out
the menus locked by the Minimum
Menu Lock, plus the
QUALITY MENU
and the
PAPER
HANDLING MENU
.
●
Intermediate Menu Lock. All items
in the following menus are locked
out:
◦
PAPER HANDLING MENU
◦
CONFIGURE DEVICE MENU
◦
DIAGNOSTICS MENU
◦
SERVICE MENU
NOTE: Intermediate Menu Lock
is a stand-alone menu. It does not
build on other menus.
●
Maximum Menu Lock. Locks out
the menus locked by Minimum
Menu Lock and Moderate Menu
Lock, plus the
PRINTING MENU
,
INFORMATION MENU
, and the
Job Cancel
key.
NOTE:
If the menu item is locked, any
attempt by the user to change a variable
from the front panel will generate a
warning on the control panel display
indicating that the control panel menus
are locked.
7
Embedded Web Server Options
Use this feature to display or hide
Embedded Web Server pages as well as
to enable or disable some capabilities of
the device.
40
Chapter 3 Configuring the product from the Settings screens
ENWW
8
Options for Services
Use this feature to enable services for
the printer:
●
Remote Firmware Upgrade.
Allows you to enable or disable
upgrades to the device firmware.
●
Service Loading. Allows you to
enable or disable the ability for
third-party applications to load
custom services on the device.
●
Job Retention. Allows you to
enable or disable Job Retention
capabilities (Job Hold, Proof,
Store, and PIN Printing).
9
Direct Ports (USB/IEEE 1284)
Use this feature to force users to
communicate with the device over a
network. Setting this option allows more
control of device usage by enforcing
network defined permissions.
When this setting is applied, the device
turns off and then back on to disable the
direct port.